Discover Amazon Web Service (AWS)
Objectives
The lab’s goal is to make you familiar with the AWS’s interface. In this lab, you will :
- Create an account on AWS academy if you haven’t done yet
- Store some data on Amazon Simple Storage Service (AWS S3)
- Create an Elastic Compute Cloud instance (= a virtual machine) and connect to it with SSH
- Run some basic shell commands
lsto list files in a directorycdto change the current directoryyumto install a packageaws s3 cpto copy file from S3chmodto change some file persmisiontime [commande]to compute some execution time
- Shut down your EC2 instance
1 Log on AWS
Your AWS account is located in North Virginia, do not change that.
Because your account is for academic purpose, your don’t have access to all the AWS services.
Your account is managed by AWS academy, so you have to use the AWS academy portal to access to your AWS account.
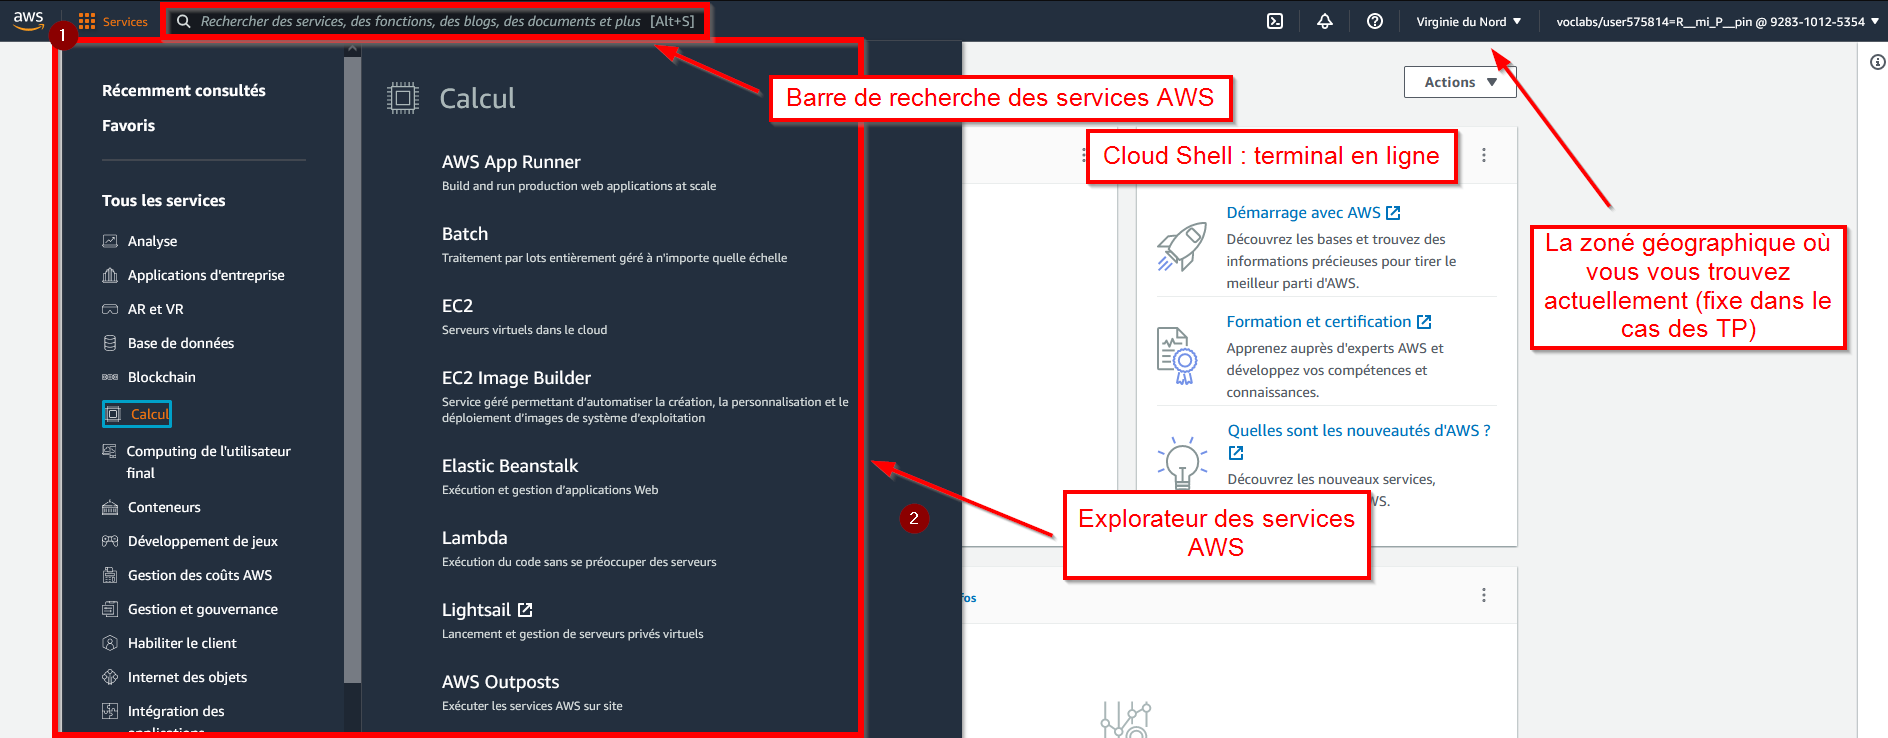
2 Exploration
In the Services tab, you should find for instance :
- EC2 in computation
- S3 in storage
- A section for databases
- A section for machine-learning
- A section for data analysis
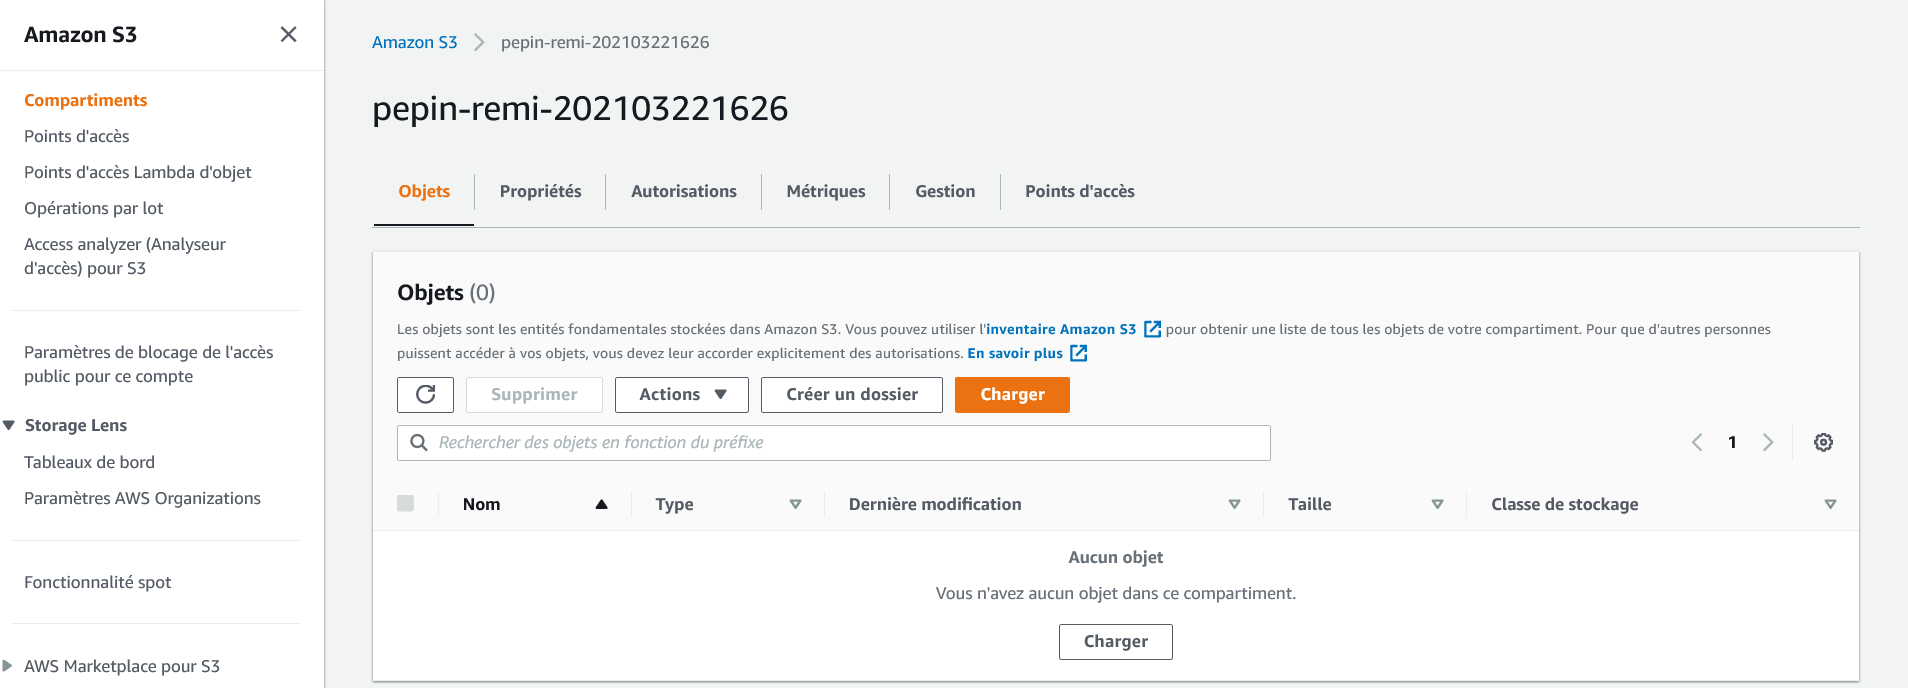
3 Create a S3 bucket
Amazon Simple Storage Service (S3) is the standard solution to store data on AWS. Amazon assured a 99,999999999 % durability for your data. This mean, is you store 10 000 000 files on S3, you can on average expect to incur a loss of a single file every 10 000 years.
The storage is quite expensive (around ~0,02 $/Go/month), knowing that you pay for read operations (around ~0,09 \$/Go). 1 To cost around 240$ a year. For instance, a 1To SSD cost less than 100$ (for a smaller durability), and a cloud storage solution (like drop box) for private individual cost 10$/month for 2To (for the same durability). But the use case are different. S3 is for data access frequently by other AWS services. There is other storage solution (like S3 glacier) for archive, or databases.
All AWS services can natively read from and write to S3, if they have some access right. So, every application you deploy on AWS can import/export data from/to S3. A file stored in S3 is called an “object”, and can be access by a unique URL. You can limit access right to a specific file.
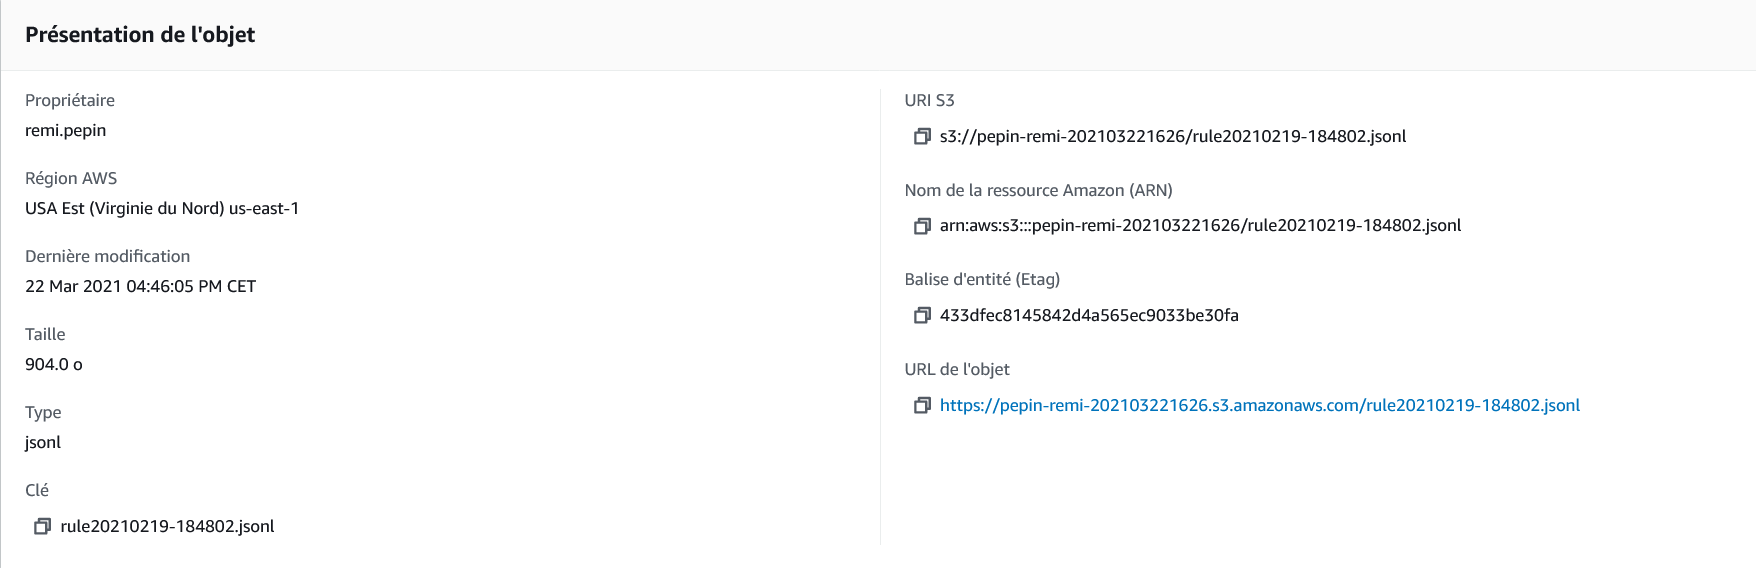
4 Import some files to your bucket
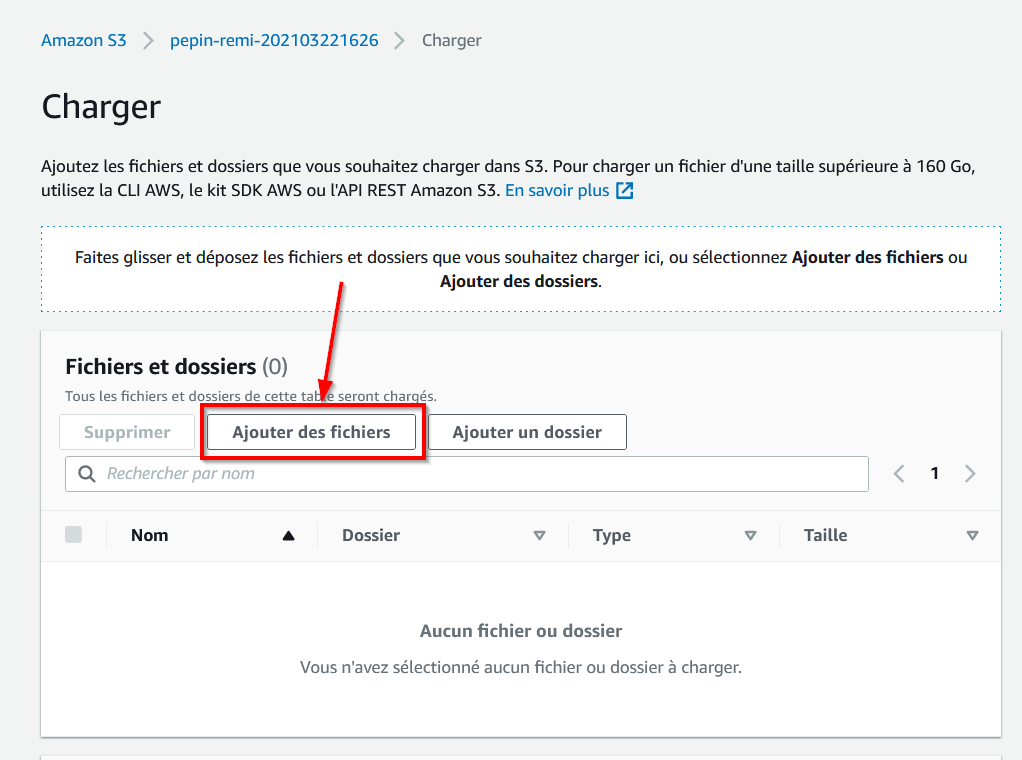
-
- You will land on the file page, and found to link to access to your file. One is the URL of the file, the other is the S3 URI
-
5 SSH key creation
SSH (Secure SHell) protocol allow a secure remote connection to a machine. Moreover, with SSH you can control the remote machine. For more details, you can read this page. But first you need a private key to authenticate yourself.
-
- select the ppk format if you use windows,
- or pem if you use Linux / macOs
-
- This will download your key, do not lost it !
-
cd ~/Downloads
chmod 400 labsuser.pem
Do not close this terminal
6 Create your first virtual machine
-
- First, you must choose an image for your machine (called AMI pour Amazon Machine Image). This image contain an OS and some default applications.
-
- Then you will select the hardware configuration. For instance, for a general usage machine you can choose a
t2.microfor a cheap but weak machine (0.012$/hour, 1 core, 1Go Ram) or a more powerful and more expensive one liket2.xlarge(0.188$/hour, 8 core, 32Go Ram). Because you pay for how long your EC2 instance are up, turn off you machine at the end of the lab !
- Then you will select the hardware configuration. For instance, for a general usage machine you can choose a
Congrats! Your VM is launching.
7 Connect to the EC2 instance
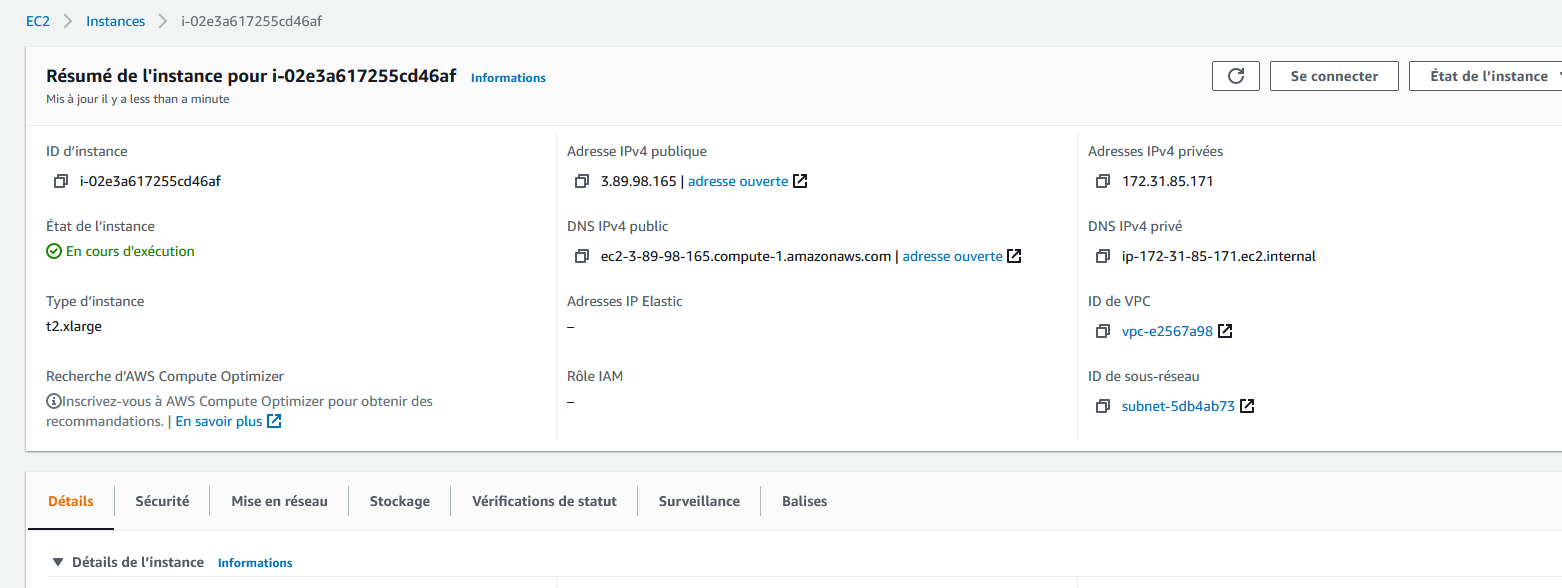
You will find much information, but the most important one is its Public IPv4 address which is its IP address (Internet Protocol) used to access your machine from outside AWS.
7.1 Windows user
-
- Windows > 5-Informatique > PuTTY
Now a terminal will open
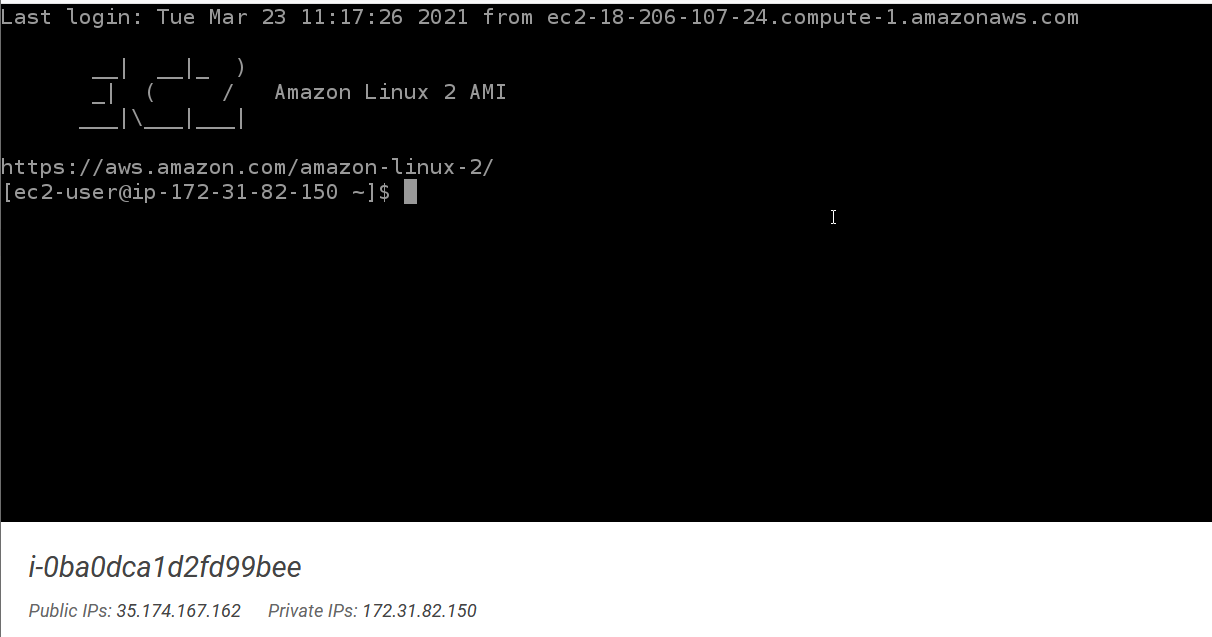
Tada ! your are connected to your virtual machine. Although, this terminal is on your computer, every command you type are executed on the remote machine. This make it possible to run huge computation without altering your own performance. But, this machine do not have any graphical interface (GUI), so you need so basics of shell command.
7.2 macOS/Linux user
-
ssh -i labsuser.pem ec2-user@[public-ip]Replace [public-ip] by your public ip
8 Play with your VM
In this section you will learn some basics of shell, and reproduce the benchmark of language made in the first lesson. You will:
- Get all the files for the benchmark
- Install R and a python package on your machine
- Run the benchmark
This benchmark compare the time to compute the max temperature for some year based on the USA weather data. Each file contains all the weather data for one year, and each record is a weather observation. An observation looks like this:
0029029070999991901010106004+64333+023450FM-12+000599999V0202701N015919999999N0000001N9-00781+99999102001ADDGF108991999999999999999999It’s a positional file, with the temperature at the position [87, 91] and it’s quality at position 91. In the example the temperature is -0078 deca Celsius (so -7.8°C), with a quality of 1 (a good quality). Each program loads line by line the data and computes the max by updating the current max value (so a \(\mathcal{O}(n)\) in computation time and \(\mathcal{O}(1)\) in memory) (expect for R that load all the data in memory so \(\mathcal{O}(n)\) in memory). But each language has its specificities:
- python: dynamic typing, just in time compilation to byte code then interpreted by python
- java: static typing, ahead of time compilation to byte code then interpreted by java
- C: statis typing, ahead of time compilation to machine code then executed by the OS
- bash: no type like python/java/C, interpeted by your OS
Here is some bash commands
| Command | Use |
|---|---|
| sudo | Super user : basically you have all the rights |
| cd [target_directory] | Change directory : move in the file tree. To go to the parent directory do cd ../ |
| ls (or ll) | List : list all the file in the current directory |
| mkdir [directory_name] | Make directory : create a directory |
| rm [file_name] | Remove : remove a file. You cannot remove a none empty directory by default. You should use the rm [file_name] -r to do so. ⚠️ NEVER execute the command rm -rf / because you will remove all the files on the current machine |
| chmod 764 [file_name] | Change mode : change the access right ofyour files. Without more detail, the access right 764 gives read, write and execution rights to the owner of the file. |
| unzip [file_name] | Unzip : unzip files |
| yum install [package] | Package manager for some linux distribution. It’s like pip but for Linux. |
| aws s3 cp [s3://URI] | Specific AWS command. Copy file from s3 to the current machine |
| amazon-linux-extras [package] | Like yum but for amazon machine. |
8.1 Benchmark setup
In the terminal :
-
- Use the command
aws s3 cp <s3://URI> <output_folder> - Replace
<s3://URI>with the URI of the file you upload in your S3 bucket - Replace
<output_folder>with.(current directory) - You should get a command like this :
aws s3 cp s3://ensai-ldeneuville-20240430/lab0_files.zip .
- Use the command
-
- For more details, the chmod wikipedia page provides more details.
-
- This script download some data from the NOAA (~ météo france in the USA) server
8.2 Install R, java, C compiler and a python package
Your VM doesn’t have all the require packages for the benchmark.
-
- To install it use yum, a package manager for Linux.
- The exact command is
sudo yum install -y python3-devel.x86_64- sudo: to have super user right,
- yum: to use the package manager,
- install: to install a package,
- -y: to validate the installation,
- python3-devel.x86_64: the package name
-
- in the same way, install java and GCC with
sudo yum install java gcc -y
- in the same way, install java and GCC with
-
- install Cython and then compile the Cython code:
pip3 install Cythoncd cython_code: change directory and go in the cython_code directorypython3 setup.py build_ext --inplaceto run the compilationcd ..to go back to the parent folder
-
- with the following command :
sudo amazon-linux-extras install R4 -y. - Just wait 1-2 minutes.
- with the following command :
8.3 Benchmark
Now it’s time to run the benchmark. To do so, you will use the time command. time compute the execution time of the following command. For example : time ./get_data.sh . Write all the results, and compare then with the course. If results are different, try to understand why.
Which one is the fastest and the slowest ?
8.4 A shell in your web browser
After 30 seconds you can use a cloud shell. You can do the same thing with your cloud shell as the previous SSH shell.
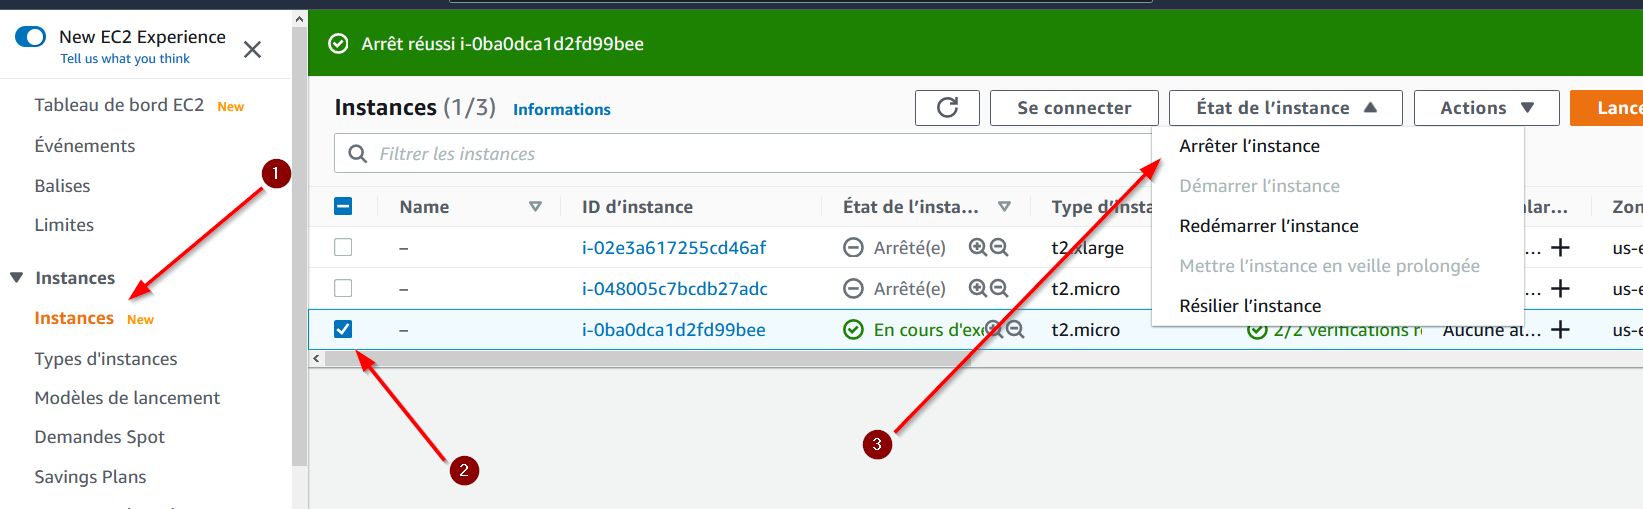
Shut down your machine
Because your EC2 instance is billed by time and not usage, once your work is done, shut down it. Although the cost is small, a small cost*24*7 for 1 week or running instance can cost 10$. And for bigger machine in a company maybe 100$ or 1000$.
To shut down your machine :
Prepare next Lab
If you plan to continue on AWS (recommended for engineers), follow these instructions to prepare for the next lab.